

Have you ever opened your inbox only to find it cluttered with irrelevant or inappropriate submissions from your website’s contact form?
We’ve all been there, and it’s not just a nuisance – it can be a real time-sink.
Today, I’m going to walk you through a super handy trick to keep your inbox spick and span: blocking specific words from Gravity Forms submissions.
Contact form spam is not just an issue with Gravity Forms, in fact, it could affect any contact form on any website – even if you have a CAPTCHA or other form of anti-spam protection.
Step-by-Step Guide: Blocking Words in Gravity Forms with Blocklist for Forms
Here’s a step-by-step walkthrough on how you can keep those unwanted words at bay from your Gravity Forms submissions:
Step 1: Get Your Hands on Blocklist for Forms
First things first, let’s bring Blocklist for Forms into your WordPress stack.
Blocklist for Forms is a lightweight, simple WordPress plugin specifically designed to block unwanted words from WordPress contact forms (including Gravity Forms).
Head over here to purchase the plugin. Think of it as investing in a cleaner, more professional inbox.
Once you’ve made the purchase, you’ll be able to download the plugin from your account area.
Step 2: Installing and Activating Blocklist for Forms
Next up, installing the plugin. In your WordPress dashboard, go to ‘Plugins’ and click on ‘Add New’.
Then, choose ‘Upload Plugin’, and select the Blocklist for Forms .zip file that you downloaded from your account area.
Click ‘Install Now‘, and once it’s installed, hit that ‘Activate‘ button. Voilà, you’re now a proud user of Blocklist for Forms!
Step 3: Choose which words to block from form submissions
With Blocklist for Forms ready to roll, it’s time to specify which words you want to block. Navigate to the ‘Settings’ area in your WordPress admin panel then select “Blocklist for Forms”
Here, you can enter your own custom words to block from your form submissions, and also integrate witht the existing WordPress comment disallowed words system.
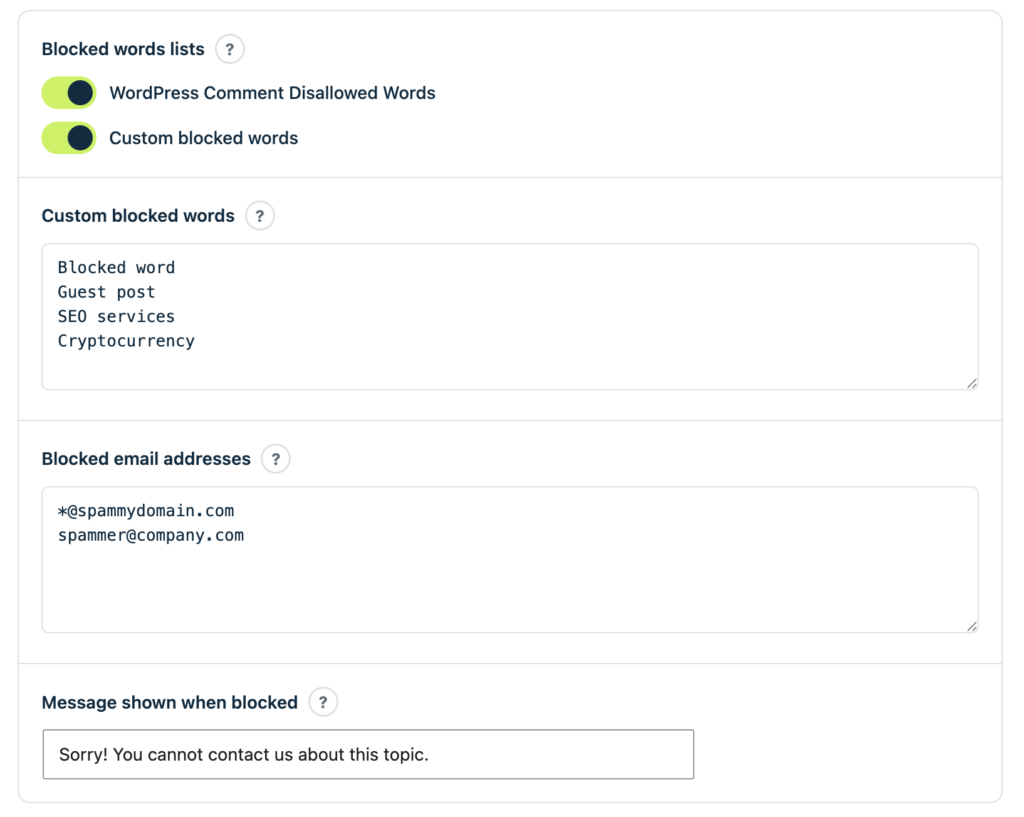
This is where the magic happens. Simply type in the words you want to block, one per line.
Be it spammy, inappropriate, or just plain irrelevant words – this is where they meet their end.
Step 4: Selecting Gravity Forms in Blocklist for Forms
Almost there! Now, let’s make sure Blocklist for Forms knows you’re using it with Gravity Forms.
Go to Blocklist for Forms’s plugin options. You’ll see a list of form plugins it can work with. Find Gravity Forms and give it a tick.
Blocklist for Forms can actually detect which form plugin you’re using, but it’s good to make sure it’s definitely enabled:
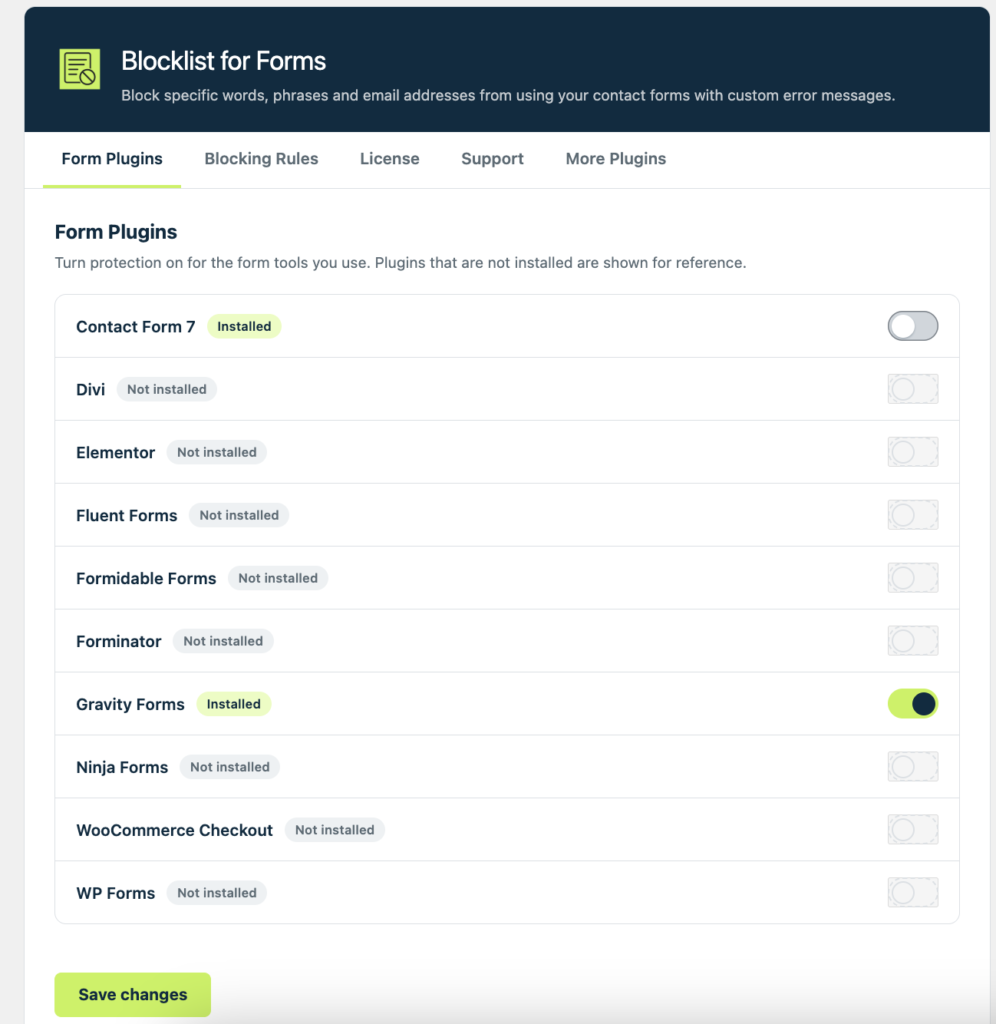
Step 6: Set a custom message for rejected messages
As a final touch, you can also set a custom ‘rejection’ message here:
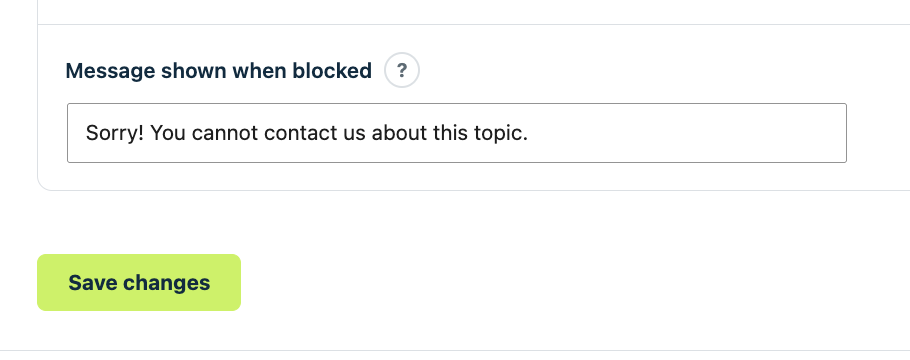
Step 7: Enjoy Your Cleaner Inbox 🎉
That’s it! You’ve now set up Blocklist for Forms to work with Gravity Forms and block those pesky words.
Go ahead, check your form submissions. You should see a noticeable drop in unwanted entries.
Your inbox is now a cleaner, more professional place, thanks to a few clicks and our Blocklist for Forms plugin!
Conclusion: Blocklist for Forms is a game-changer!
In conclusion, implementing Blocklist for Forms with your Gravity Forms is more than just a neat trick; it’s an essential step towards maintaining the professionalism and efficiency of your digital workspace.
By carefully selecting words to block, you not only safeguard your inbox from unwanted spam but also ensure that the messages you receive are relevant and worthy of your time.
Remember, every minute saved from sorting through irrelevant emails is a minute you can spend growing your business or engaging with genuine customers and clients.
Take Control over your Contact Forms
Get Blocklist for Forms – Form Defender today 👇
Works with all major WordPress forms plugins including WP Forms, Gravity Forms, Fluent Forms, Formidable Forms & many more!